I haven't been able to focus too much on my cooking since my visit to New York City. Been quite sick, frankly. But today, since my mother is sleeping at my grandparents' house, dinner is on me! This is my version of the classic soy sauce chicken. So far, no complaints so I guess it’s safe to eat! =)
Ingredients:
4 boneless chicken thighs, skinned (you can choose to leave the skin on if you wish)
1 small onions, chopped
Some olive oil for frying
Dried shitake mushrooms (about a handful)
Salt & pepper
Marinade Ingredients:
1/3 cup of soy sauce
1/3 cup of water
1 ½ tbs thick soy sauce (or dark soy sauce)
2 tbs rice wine
4 tbs brown sugar
2 stalks of scallions (green onions), chopped
3 cloves of garlic, crushed
4 thick slices of ginger
2 tsp crushed pepper flakes (omit if you’re not a fan of spicy foods)


Directions:
- Combine all the marinade ingredients together in a bowl.
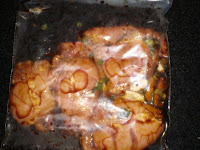
- Make a couple of slits on the chicken thighs and place chicken in a large zip-lock bag.
- Pour the bowl of marinade into the zip-lock bag and marinate for 2 hours (the longer the better).
- In the meantime, soak the shitake mushrooms in boiling water for 10 minutes. Drain and squeeze any excess liquid out of the mushrooms.
- After the chicken has been marinated, remove it from the zip-lock bag and reserve the marinade. In a wok/pan, heat up the olive oil on high heat and brown the chicken thighs on both sides.
- Add onions and saute for about 1 minute.
- Bring the reserve marinade to a boil in a separate pan and pour over the chicken.
- Add the shitake mushrooms, along with some salt and pepper. Simmer on low heat for 30 minutes.
You can reserve the marinade for braising vegetables or other meats!
This serves 4 people.
5 Spice Beef
Monday, December 29, 2008
| Author:
A Vegetarian that Cooks Meat
I'm in New York City at the moment and the weather here can be unpredictable... It's blistering cold one day, and unseasonably warm the next. This dish here is simple and suitable for the winters, due to the different spices in there.
I'm in love with Asian spices, and there isn't anything more Asian than five spice powder! The fragrant is undeniably heartwarming, and chances are, if something is marinated in five spice powder, I am most likely to chug it!
Ingredients:
- ½ pound of thinly sliced beef
- some dried mushrooms (optional)
- 1 onion, cut into wedges
- 1 bell pepper, thinly sliced
- 3 or 4 leaves of Napa Cabbage coarsely chopped
- 1 small tomato cut into parts (optional)
- 2 scallion stalks cut into 2-inch pieces
- 1 cloves minced garlic
- 1 tbs soy sauce*
- ¼ tsp five spice powder
- ½ tsp sugar*
- ¼ cup beef broth*
- 1 tsp cornstarch*
- 1 tsp sesame oil*
Feel free to throw in any other vegetables you like! I just used whatever is conveniently in my fridge~
Directions:
1- Combine all starred (*) ingredients and set aside.
2- Heat up some oil in a wok/frying pan over high heat. Stir fry garlic and five spice powder until fragrant (about 25-30 seconds).
3- Add beef and stir fry until meat is no longer pink and fully cooked. Remove from wok and set aside.
4- In the same wok, add onions and stir fry for a minute and add cabbage. Stir-fry until the cabbage starts to wilt, but still looks crisp (2-3 minutes). Add peppers and stir-fry for another 2 minutes.
5- Add the cooked beef and scallions and cook for about 2 minutes.
6- Remember the mixture of starred (*) ingredient you set aside earlier? Start pouring them over your meat and veggies for about a minute. Sauce will thicken. Stir in the tomatoes and scallions for another minute.
Serves 2 people, or one REALLY hungry dude! I don't need to mention that it's best with rice.... right??
So it’s not the fanciest dish, but it tastes good! >_<
So I've been awfully sick the past few weeks. No appetite, really. I used every molecule of ATP & ADP (energy) in me to studying for the wretched finals. For some odd reason, it's been raining in Southern California. Nothing compared to New York City, but the weather change made me feel worse. The depression from being homesick nine months out of the year does not help either. I've lost some weight, and I promised my parents (prior to my leaving NYC for the new semester) that I'd try to eat regularly and not indulge myself in so much school work. Basically, I'm making up for the weight loss in just 2 days. Figured it was better than nothing.
I walked into Trader Joe's on my way back from the library the other day and saw a bag of organic brussel sprouts. My eyes widened and I began to salivate. Ok ok, I know how people feel about brussel sprouts, but c'mon! I'm a vegetarian, for heaven's sake! I'm already doing without meat. I'm not going to limit myself from veggies, too!

The reason why I love brussel sprouts so much is because of it's bitterness. Reminds me of bitter gourd. My assumption is; if you're Asian, you've had bitter gourd before. Anyway, back to the brussel sprouts. So how does one make a simple (and I mean SIMPLE) brussel sprouts dish, eliminating some of it's bitter taste.
Ingredients
- 3 cups of brussel sprouts (I think that's approximately 1 bag of 'em from Trader Joe's. Forgot to check)
- 1 ½ tablespoon balsamic vinegar (the balsamic vinegar gives it a sweet & tangy taste, without adding sugar)
- salt to taste (I used 1 teaspoon of kosher salt... it was right there on the counter. Got too lazy to go that extra foot for regular salt)
- cracked peppercorn to taste
- minced ginger (optional, but it makes the dish smell so Christmassy!)
- cooking spray
1. Preheat the oven to 350° degrees and spray your roasting pan with cooking spray.
2. Cut the brussel sprouts into halves & quarters and pour them into the pan.
3. Drizzle the balsamic vinegar on top and sprinkle with salt & pepper.
4. Bake for 25 minutes and you're done! I must warn you, there will be some shrinkage (see pictures below), so if you're planning on making it for a crowd, double the recipe! It should look something like this:


oOoh, time for me to eat! Bye!
After perusing through so many food blogs, I can only hold my head down in shame. I'll admit to it, I don't consider myself a cook. I am just a trial-and-error food prep. I hope I don't disappoint any readers who accidentally stumble upon my blog. As my utmost close friends all know, I am a total wreck during finals. Well, guess what this week is?! Yep! It's every student's nightmare... the inevitable and undeniably gut-wrenching FINALS WEEK! If weren't for the wonderful genetics my parents have afforded me, my luscious head of hair would be all gone from the constant hair-ripping. I am notorious for baking when I am stressed out. In light of the holidays, I am baking some holiday treats for some of my friends in San Francisco. Take into account, these are made to last long enough to get to them via mail (3-4 days at most) and to survive the shuffling during mail delivery. I wouldn't want them to open up a box of "crap" during the holidays, now would I? Then I'd just be asking for it...

Ingredients - 1/2 cup of sugar + 4 tablespoons Splenda
- 3/4 cup flour
- 1/2 cup of unsweetened cocoa
- 2 teaspoons of cornstarch
- 1/4 teaspoon of baking soda
- 1/4 teaspoon salt
- 2/3 cup non-fat vanilla yogurt
- nonstick cooking spray
- Preheat the oven at 350 degrees.
- Spray a 9"x13" baking dish/pan with nonstick cooking spray.- Mix and sift all the dry ingredients together in a bowl.
- Gradually fold in the yogurt with a wooden spoon, enough so that your dry ingredients will not splatter all over the place when blending with the electric blender. Don't fear the thickness of the batter You didn't do anything wrong!
- Once the brownie batter is well incorporated (smooth and shiny), pour it into the pan. Spread the batter evenly and chill the brownie batter in the freezer for 10-15 minutes.
While the brownie batter is resting in the freezer, let's work on our Almost Non-Fat Cheesecake batter: - cream cheese (softened)
- 1/2 can of Fat Free Condensed milk
- 1 egg
- 1 1/2 tablespoon of lime juice (you can use lemon, as well, but all I had at home were limes)
- 1/2 teaspoon of vanilla extract
- 1 tablespoon of flour (optional)
- Cut up the cream cheese in large pieces and blend until smooth.
- Slowly add in the egg, lime juice, and vanilla extract. - Once incorporated, blend in the the flour. For me, this is a crucial ingredient since I will be mailing this out. The cheesecake must be able to withstand shuffling during shipping & handling. Also, the cheesecake will not melt even if kept in warm temperature for a couple of days. I know it's winter and I shouldn't be worrying about the temperature, but precautions are must! Remember the brownie batter in the freezer? It's time to take that out. Pour the cheesecake batter over the brownie batter and
carefully spread it evenly on top of the brownie. For Raspberry Swirls:
- 3 tablespoons raspberry preserve/jam
- 1 teaspoon lemon/lime juice
- In a sauce pan, heat up the raspberry jam and lemon/lime juice until it becomes the consistency of a puree. - Remove from pan and let cool for about 10 minutes. - Drop the raspberry puree (half teaspoonful or less at a time)onto the cheesecake brownie mixture. Using a knife, slowly cut into the the droplets of puree and make swirls.
Now you're ready to pop it into the oven! Bake for 40 minutes (at 350 degrees).
Once the cheesecake brownie has been baked, remove the pan from the oven and let it cool at room temperature.
Refrigerate overnight and cut into squares. Enjoy!
P.S- This is my first time blogging (my pictures are horrible, I know) and I'm nervous, so please don't be too harsh with the comments!!!


